Annie’s Farmhouse Style Kit Club November 2021 Review Thankful Sign + Coupon
We're super excited to share our second review of Annie's Farmhouse Style Kit Club! This month's kit will help us make a “Thankful Sign”, just in time for Thanksgiving!!!
Annie's Farmhouse Style Kit Club is a monthly subscription that includes all the crafting materials and easy step-by-step instructions you need to create farmhouse style décor for your home. All you need to provide are scissors and a glue gun.
Bring fresh, farmhouse character to your house or apartment with handmade, DIY farmhouse inspired creations that you'll make yourself. Perfect for gifting or keeping for yourself!
Annie's Farmhouse Style Kit Club Coupon: Get 75% off your first month of Annie's using this link and coupon code SHARE75. This deal is good for a limited time only!
Annie's Farmhouse Style Kit Club November 2021 Review – Thankful Sign
Annie’s sent their Thankful sign kit in a white, artsy-printed, padded envelope.

The project for this month is Thankful Sign! It looks so lovely and will look good as wall décor! Whoops! I also got another kit and took of a photo of it at the same. Stay tuned for our “Kind Tote and Bangle” review soon! 🙂

Here are the included materials in the kit: wood frame, wood rectangle, rub-on with a craft stick, paint, cosmetic sponges, paintbrush, painter’s tape, sandpaper, and adhesive foam strip. I also needed to supply waxed or parchment paper, a flat screwdriver, paper towel, a water bowl, a ruler, and a pencil.

Annie’s Farmhouse Kit Club also includes an instruction booklet that contains colored step-by-step instructions that are very easy to follow!


Now, let’s see how I made this Thankful Sign!
Thankful Sign
I started by painting the wood rectangle white using the paintbrush they also sent me. I did put a second coat of paint on it!

Then, I painted the backer board with white paint. This only needed one coat because it was already white!

Here are the backer board and wood rectangle, both painted with white. I placed it in a safe space and waited for it to dry overnight. Acrylic paint will dry in about 4 hours though.

While waiting for the backer board and wood rectangle to dry, I proceeded by painting the wooden frame black.

Then I started to paint the backer board. I used the included painter's tape to create lines on the board. The small-length tape at the center served as a spacer between the longer blue tape.

I repeated this pattern to make many parallel lines of tape. Thanks to the small blue tape that serves as its spacer, they were aligned perfectly!

After mixing a tiny dab of black paint with white paint on a paper plate to get a light gray color, I painted the light gray color between the blue tape strips using the included cosmetic sponge.

After this dried (overnight, again) I removed the blue strips carefully — one at a time!

After removing all the blue strips — you can see the lovely light gray lines contrasting with the white backer board!

I mixed the white and a little more black paint to get a darker gray color onto the paper plate using the paint brush.

I used a different cosmetic sponge to paint the dark gray color between my newly added blue stripes.

After this paint dried, I added blue tape strips in the opposite direction and painted the uncovered squares black.


After painting all the uncovered squared, I then gently removed all the the blue tape.

I removed each strip one by one!

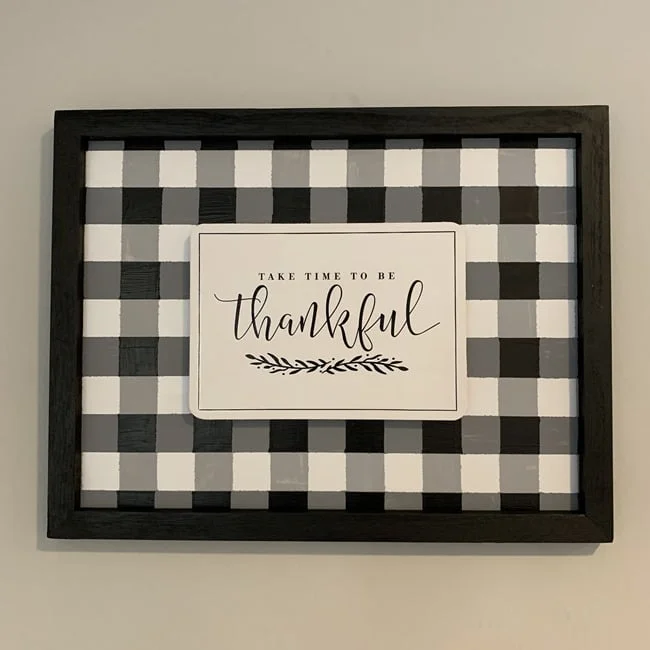
Here’s how it turned out! I love the checkerboard pattern – it looks so cool!

I then placed the backer into the frame.

And I rubbed the “Take Time to Be Thankful” decal on the wood rectangle with the included popsicle stick. I was very careful about making sure all the decal transferred before lifting the decal backing paper from the board.

Here is what the rub-on decal looked on the wood rectangle!

The next step was to to stick the adhesive foam strips on the back of the wood rectangle and remove peel the backing off the strips.

I then placed the rub-on sheet to the rectangle wood at the center of the checkerboard backer. It's upside-down because the picture hanger is on the top of the back of the frame and it is hanging off my table.

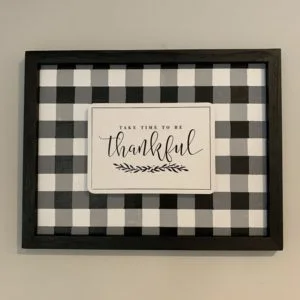
This is my finished Annie’s Farmhouse Style Kit Club Thankful Sign!

This could be pretty Thanksgiving wall décor for our living room!

I decided to hang it on a wall in my kitchen nook. I love how it matches my gray wall!
Here’s a side view of the Thankful Sign!

Wrap Up
This Thankful Sign from Annie’s Farmhouse Style Kit Club is a craft project that I would not have thought to do on my own. I've never attempted painting a checkerboard, and while I was afraid of totally messing this up, I was so happy with the result! I’m so happy that Annie's provided most of the materials needed and the full-color step-by-step instructions made it a breeze to finish this sign! I love how it came just in time for decorating for Thanksgiving and how it matches my gray wall. I like having craft projects like these to help me decorate my home and learn amazing, new crafting techniques as well!
Annie's Farmhouse Kit Club Coupon: Get 75% off your first month of Annie's using this link and coupon code SHARE75. This deal is good for a limited time only!
What do you think of Annie's Farmhouse Style Kit Club Thankful Sign?
Learn more or subscribe to Annie’s Farmhouse Style Kit Club here!
Annie's Farmhouse Style Kit Club is a monthly subscription that includes all the crafting materials and easy step-by-step instructions you need to create farmhouse style décor for your home. All you need to provide are scissors and a glue gun.
Bring fresh, farmhouse character to your house or apartment with handmade, DIY farmhouse inspired creations that you'll make yourself. Perfect for gifting or keeping for yourself!
Coupon: Get 75% off your first month of Annie's using this link and coupon code SHARE75. This deal is good for a limited time only!
Price: $19.99/month
Ships to: Canada, US
Shipping Cost: $5.95
Annie’s Farmhouse Style Kit Club
Annie's Farmhouse Style Kit Club is a monthly subscription that includes all the crafting materials and easy step-by-step instructions you need to create farmhouse style decor for your home. All you need to provide are scissors and a glue gun.
Bring fresh, farmhouse character to your house or apartment with handmade, DIY farmhouse inspired creations that you'll make yourself. Perfect for gifting or keeping for yourself!
Get 50% off your first month of Annie's Kit Clubs using this link (no coupon code needed!)
Annie's Farmhouse Style Kit Club Reviews
Annie's Farmhouse Style Kit Club Spoilers

Annie's Farmhouse Style Kit Club Coupons